Improving your Bench Microtome
Watch out for these symbols in my projects!
|
|
|
|
|
|
About this page | Project Index | Larry's Learner Purchases on-line | This Project Page: 1 - 2 - 3 - 4 | Micscape | Mic-UK |
|
Improving your Bench Microtome Page 3
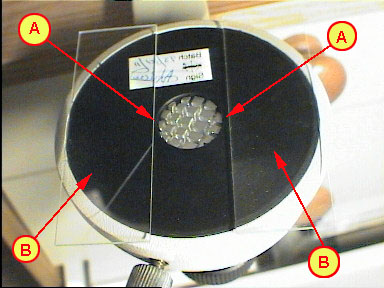
(A) when attaching the slides. This will ensure the chuck and the wax block, when fitted for sectioning, does not snag the glass slides. It is important to make sure you do not use a permanent glue! At some point, the glass might break and you will have a major problem trying to replace the broken slide. I used a contact adhesive (Evostick) but instead of applying it to both surfaces as advised, I simply applied it to the microtome surface only at (B) and then pressed the slide onto it. In practice, when sectioning, quite a bit of water comes into contact with the glass and microtome surface. In a short time the temporary glue bond breaks and the glass slides start to come free. This happens quite quickly even after one or two sessions... but it is a preferable situation. It is quite easy to re-glue the glass slides back on after every one or two sessions of sectioning. The glass slides act as frictionless (well almost) runners on which your cutting tool will slide smoothly and evenly towards the wax block. Once the glass slides are in position - it will no-longer be possible to use a sectioning razor (a poor cutting tool anyway) for hand sectioning. A razor will tend to dip in the middle where there is a space between the glass slides - and thus no support - causing your sections to be non-uniform in thickness. In doing this fix to the microtome, we are preparing it for use with a plane iron as the cutting tool - as described in part 1 of this project and later parts of the hand-sectioning project. The picture below shows my microtome set up ready for use. The glass slides are now glued in place. You should be wary of catching your hands on those glass corners jutting out from the rim of the microtome!
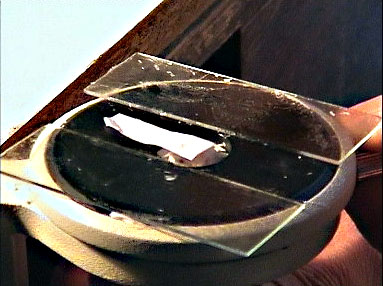
When setting up the modified microtome, the glass slides will be positioned towards
you... that is - they will form two runners with their short ends directly in front of you. When you look down
at the microtome and you sit in front of it - the slides will appear like the two verticals of the number '11'
and will not appear as the horizontal '=' |
|
About this page | Project Index | Larry's Learner Purchases on-line | This Project Page: 1 - 2 - 3 - 4 | Micscape | Mic-UK | |
|
All material is copyright of Larry Legg, Microscopy-UK
and Onview.net Ltd 1998/99/2000. All rights reserved. All non-email communication to Larry may
be made by fax or written (postal mail) to:- |